Archive for the ‘SBS 2008’ Category


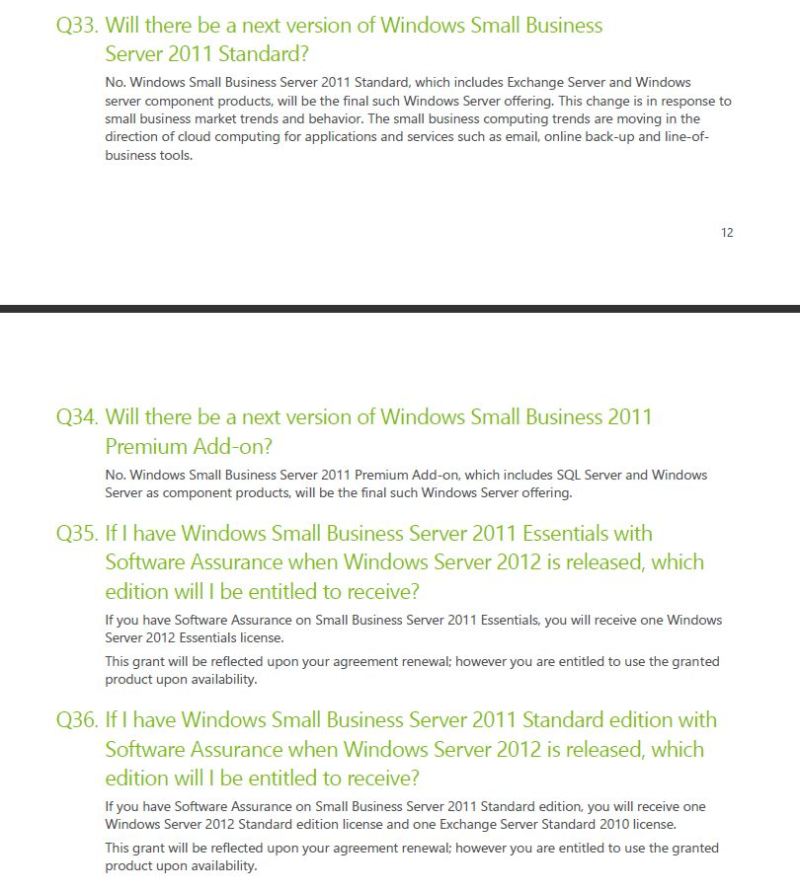
Perhaps you missed the news from Microsoft.  From the FAQs on the Server 2012 web page, here are some pertinent questions and answers: click here to go to the page


Image

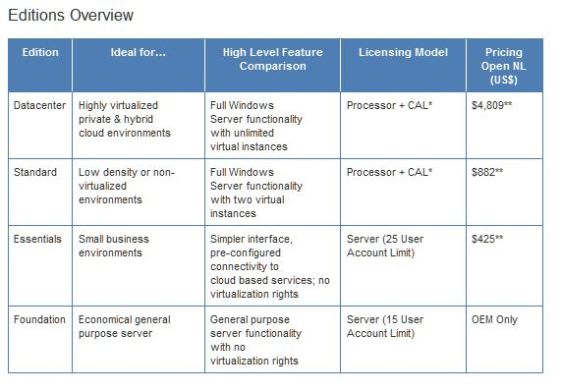
To put some details on it, from the same page, here is the licensing summary:

Image
If you want Exchange and SharePoint, there are two ways to get it.  First, use 2012 Standard or Datacenter versions, but separate Exchange and SharePoint licenses, and install and set them up separately.  Or, use Essentials which supports Office 365.  Up to 25 users, that is.

Why would Microsoft make this abrupt change after finally developing a quite robust, capable version of SBS in 2011?  Is is that they would like to push SMB users to Office 365?  Well, that would be fine, but to limit it to 25 users makes absolutely no sense.  Perhaps there is a technical reason for this limit, and I for one would welcome knowing about it.  Or a marketing reason?  Perhaps no one is left who gets SMB users and their needs.

Many SBS users tenaciously cling to SBS 2003, but if there were any better reason to migrate to 2011 besides that it won’t soon be available any longer, I cannot image one.  Nor the idea that Microsoft is locking these users into not upgrading for another decade.

Oh, and be sure and contact me for some help if you need it!


Just when you think everything was working.

The Symptoms of the Problem

A system administrator, responsible for assigning users, called to let me know there was an issue.  He could not create a new user, nor could he assign an existing user to a machine, much less make them local adminstrators.  What was even more puzzling was when he used the SBS Console to do this, it appeared to work.  However, went he went back to that user’s settings, no changes he made showed up.

Obviously this was a feature he wanted to remove.

Finding the Problem

It was not obvious what was causing the system to behave this way.  In fact, it seemed whereever I looked, I could find no problems.  It just didn’t work.

Then I happed to look at the system administrator account (we disabled Administrator and were using another account name).  I don’t know exactly why, but happened to look at what groups that account belonged to using the Console.  To my shock, only a few groups appeared:  all users, Windows SBS Fax Users, and Window SBS Link Users. 

Fixing the Problem

I also checked on roles, and the proper group membership was missing there as well.  So I added the missing groups to the role and to the user.  I also checked on the role for standard user, which was also missing some groups, so I fixed that role, too.  Then I applied the Standard User role to the individual users, and everyone was back in business. The system administrator could now work properly as well.

You may not be as lucky as I to have a handful of working SBS 2011 systems to use as a guide, so I am pasting in some screen shots for your reference.

The system admininistrator account

And Network Administrator Role

NetworkAdministrator Role Memberships


Never did find out why this fell off during conversion.  The SBS 2008 groups have different names, but….


Introduction

The SBS implementation of SharePoint Foundation relies on SQL 2008 R2 Express and any database has a size limitation of 10GB. Because I am a SharePoint bigot, I encourage my clients to take advantage of SharePoint and use it instead of shared files.  It certainly offers lots of benefits:

  • Version control
  • File granularity for permissions
  • Remotely accessible without the need for a vpn connection
  • Check-out and check-in for editing protection
  • Discussion groups and custom lists
  • Blogs and wikis
  • And lots more

SharePoint is also easily managed once you get the hang of it.

(Anyway, I will do another post on how users are taking advantage of SharePoint to do things for their businesses.  But this post focuses on what to do when they have done things too well and grown up to the maximum database size.  It equally applies if you just want a new web application – perhaps because you want different permissions on it from the standard site.)

Mulltiple Databases

While the maximum size of a single database is 10GB, a SharePoint installation can have multiple databases.  You can create a new web application with a new database in a single step.  SharePoint does all the heavy lifting for you.

These steps are done in SharePoint 2010 Central Administration.  Lacnch it on your SBS Server and see the home screen:

Farm Management Home Page

Under Application Management, choose the first item, Manage Web Applications:

You should see your SharePoint site and Central Administration.  On the ribbon, click on New and the following page opens.  I have filled it out with information to create both a new web application and a database to support it.  The fields I added or changed are highlighted in yellow.

Fields I Changed

The first field I changed was the suggested value for creating a new IIS web site.  SharePoint proposes the name

SharePoint – <random port number>.  You can use any name you wish if it is unique among existing web site names (see IIS display if you don’t know).  I decided to pick port 988, one above the SharePoint 987 for //companyweb.  So I changed the port number to 988.

SharePoint also suggest a database name of WSS_Content, which I changed to NewDataBase.  You can, and probably should, use a name that is relevant to your site like AdminData, HistoryData, etc.

If you want to use the SBS server for searching, click on the drop down box and select it.  Then click ok; you can leave the other fields as is. Once the processing screen finishes – it can take a few minutes to create the web site, application pool and update SharePoint configuration – you get the following notification

Application Created

Now Create a New Site Collection

Click Ok, and then Central Administration to go back to the home page.

While you have created a new web application, it is not yet a site that you can browse to.  You first have to create a new site collection.

Now click on Create site collections to see the site collection page.  The first thing to do is to select the web application.  On the upper right of the page you would see Web Application: and probably http:<something>.  Hopefully the something ends in :988 or whatever port you chose.  If not, click on the drop down arrow, chose change web application and then select the one you just created.

New Site Collection

Enter a site collection name in Title and a description of you wish.  Pick the type of site you want to create by choosing a template.  Then enter names for the site administrator; click on the book icon to search or type it in directly and check the name withe the person + check mark icon.  Set a quota if you have them defined and want to.

Then click ok,  and as if by magic you have a new site for your new web app and database.

Repeat the process as you need to.  In another post to come, I will go over how to customize the sites to have them all accessible from the same broswer.

What Has Just Happened?

SharePoint was busy doing some behind the scenes work for you.  It created a new Applicaiton Pool and Web Site you can see in IIS:

ApplicationPool Created

New Web Site Created

SharePoint also created a new database for you:

New SQL Database

Don’t  Forget

If you want to have this site available outside the LAN, open the port on your router and point to the SBS server. The internet URL is http://remote.<domainname&gt;.com:988 or whichever port you chose.

You can also create  apublic URL and put it in your root DNS provide that you configure alternate access messages.  Again, in another post on how to customize your new site and link the original, if you wish to.  Although you might want to have entirely different permissions on the two sites for application reasons.


yes, Virginia, there is a Santa Claus who can help you convert your physical SBS server to a virtual machine to run under Hyper-v.  But dear, they don’t tell you nearly enough, so pay careful attention to this.  Especially if you want to user the same server box to be your new Hyper-v host machine.

Preliminary Work

The assumption is that you have SBS installed on a physical machine.  You would like to use that physical machine as a Hyper-v host.  How can you convert SBS to a virtual machine?  And what does it take to host Hyper-v on that box?

If your SBS is 2008 or 2011, you needn’t worry about whether the server can support 64-bit because both of those are 65-bit operating systems.  If, however, your starting point is SBS 2003, you need to verify that it can run a 64-bit OS.  If your server is from around the time when SBS 2003 was first released, I suggest you look at a new server to save yourself a lot of frustration, time and eventually money.  You can purchase a lovely box from Dell, HP and others for about $1500.  Then  you can do a migration to SBS 2011 between two physical boxes.  See my post about setting up SBS 2011 as a virtual machine and do the migration to it.

Once you are convinced your current server box will support the Hyper-v host os, check on how much memory you you have.  I would recommend16GM as the minimum necessary for a successful system and as much more as you can add past that to accommodate the number of virtual machines you plan on hosting.

I have a few virtual machines for SBS running between 8GB and 16GB and all give more than satisfactory performance.  They run along with 4-8 other virtual machines (other 2008 R2 servers, Windows 7, and XP operating systems). More memory is better of course  but you may find the marginnal benefit of 1GB more memory to not show up in the other vm performance .

Now you have determined a proper machine to host Hyper-v with sufficient memory.  It is my very strong suggestion that you now purchase new disks for the OS hosting environment. Why? Because if something goes wrong in the conversion, you don’t want to have clobbered your original system disks to be able to go back to a physical machine.  I know the cost and complexity of new system disks will vary from installation to installation, but disk prices have dropped so much that the cost of even a pair of 500GB (RAID 1 scenario) is under $100.  What is your time for recovery worth:?

The last thing you will need is a disk that can house the .vhd created on the physical installation to be copied to the new os environment for the virtual machine.  An external USB drive is perfect for this, but an internal hard disk that can remain mounted when you create the new hosting environment works well, too.

Cleaning Up the System

Before you convert to a .vhd, do as much cleanup on your SBS system as possible.  Not only will this make the conversion faster, it will make it easier.  And in some cases, it can mean the difference between success and failure.  The conversion utility will convert up to 127GB, so if you have too much data on your system disk, it may not convert at all.

Here are some suggestions:

  1. Move your Exchange data files to another hard disk.  As a rule. I never leave them on the system volume.
  2. Do the same with your SharePoint data files.  Same rule for moving it to another disk.
  3. Move any user profiles to another disk.
  4. If you have any data files that are shared, move them as well and update the share.
  5. Empty the recycle bin.
  6. Delete any temporary files.

In short, anything that is on your system disk that is not essential to the system either delete or move.  Note: if files are small, weigh the inconvenience of moving them against the conversion impact.  A few kilobytes won’t make a difference but a few gigabytes might.

Disk2vhd Utility

You will need this free and downloadable utility to convert your system disk to a .vhd file (click to download it).  It is straightforward to use and can work with a system that is online.  I will share with you some of the tricks I have picked up to make it easier for you.

Disk2vhd works by taking a snapshot of the files to be converted.  What you don’t want to happen is have those files updated while the conversion is running, possibly causing data consistency issues.  Exchange is a case in point, so before you start the conversion, stop Exchange services.  Do the same for SharePoint and any other applications that might be updating files as they run,

If you have been following closely about the preparations, you will have detected my overall approach:  isolate the system to the c: drive, convert it to a .vhd, bring up the new os and create a virtual machine from it, and have all of the data files remain on media that are mounted onto the host operating system.

With that in mind, when you run the conversion utility, you will be just converting the system disk.

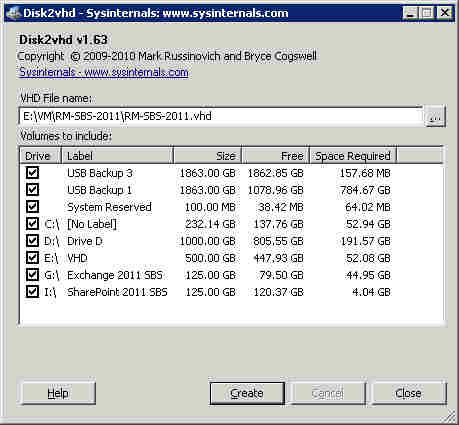
disk2vhd

In the above example, I have isolated Exchange, SharePoint and user data and even have a separate drive to store the .vhd file.  (Remember, I am a big iSCSI fan and this is a piece of cake to do).

Much  more important, however, is to note that I have selected not only drive C: but the System Reserved area as well.  If you don’t select the System Reserved area, the resulting .vhd will not be recognized as bootable.  When you try to attach it as a virtual drive and start the machine, you will get the following messages:

disk error has occurred
Ctrl+alt+del to continue

But of course there is nothing to continue to.

Choose your destination for the .vhd, then click Create.  It can take thirty minutes to over an hour, so entertain yourself while it runs.

The Hyper-v Host

Now shut down the SBS system, remove the system disk(s), insert the new disk(s) for the host os, and install the os.  If you have a license for Windows 2008 R2, use it by all means.  If you don’t own or want to pay for a license, you can download Windows 2008 Hyper-v for free.  Be aware that it has only a limited interface and that you will need to do enable remote execution of Hyper-v manager on it to be effective.  Still, it is free.

Install the os and launch Hp yer-v manager.  Create a new virtual machine following the wizard.  But instead of creating a new .vhd, instead point to the .vhd you created with the disk2vhd utility.

Before you start the virtual machine, adjust the settings as follows by highlighting that vm and clicking on settings.

  1. Memory – use dynamic setting.
  2. Processor – use the number of virtual processors that match the host cpu.
  3. Network adapter – you can use the same adapter as the host machine or an additional one.
  4. iSCSI Controller – Use this to add disk drives attached to the host system.  For example, if you have USB drives (for backup, e.g.) connect them to the virtual machine.  Same for data drives.  Note – if you are using iSCSI targets, the virtual machine can connect directly to them without adding them as hardware.

Now start the virtual machine.  What you will discover is that it doesn’t start right up like you would think.  Instead, it appears to be “hung” without the desktop appearing.  This could take from five to thirty minutes.  What is happening is that SBS is adding new devices to the system as they have been attached through the virtual interface.  When that is complete, you will get a message that new hardware has been added and you should reboot.

After the reboot, check the network settings to make sure they are correct.  You may have to run fix my network or connect to the internet wizard from the SBS console.  Check to make sure all services are properly started and that Exchange connected to the databases.

Your virtual SBS is now complete and you can add other virtual machines as necessary.


I was pulling my hair out, wondering why the clock on client machines in a SBS 2011 domain were off about 5 minutes fast.  Surely the server time was the issue, and I kept resetting it only to see it go back to its five minutes fast setting again.  So I rolled up my sleeves, dug into all the command options of w332tm and registry settings, and they all looked fine.  My server was set to use time.windows.com.

Why didn’t this work?

I finally paid attention to the result of this command:

w32tm /query /status

I slapped my forehead and also did another command

w32tm /query /source to amplify the results I was looking for

Here is what I got

Since I had set the time server to time.windows.com, I was puzzled why that time server did not show up and what the heck was VM IC Time?  Almost instantly it hit me: the hyper-v SBS 2011machine was getting its time from the host, and my settings were not overriding that.

Sure enough, I looked at the host machine (not part of the domain) and it was not using an authoritative time server and was – gasp! – about 5 minutes fast.  A few simple things fixed it all.

On the Hyper-v Host

From either the control panel or time in systray, set the computer clock.  Click on the Internet Time tab and if it is not set to synchronize, click Change Settings…. In the dialogue box that appears, click the Synchronize box and leave the server as time.windows.com or change to another value.  Click update now button, then OK to close.  Click OK again.

On the SBS 2011 Server

Open a command prompt in elevated mode (run as administrator).  Enter this command

w32tm /resync

You should see the clock change to match the value on the hyper-v host machine.

On Client Machines

You will see the time change when the client machines follow the time synchronization schedule, but you can do it immediately if you want.  Use the procedure above for the SBS Server but on your client machines.

That’s it.

There’s Another Way……

This made me think, there’s gotta be another way to deal with this.  Sure enough, a bit of snooping led me to play with the hyper-v host settings, and here is a way to let your SBS 2011 hyper-v machine throw off the shackles of the host time server.

On the hyper-v management console, click on the SBS 2011 server and choose settings.  On the left hand pane under Management, click on Integrated Services and clear the check mark next to Time Synchronization then OK or Apply.  You can actually do this while the hyper-v machine is running.

Once you have done this, log onto the SBS 2011 server, run command prompt and type

w32tm /query /source

You should now see the source changed to time.windows.com or whatever other time server source you have configured.

Either method you choose will work, but I prefer the change in Integration Services to make your SBS server less dependent on its host.


In the application event log, event ID 13042 was being posted from Windows Sever Update Services and the message Self-Update is not working.  Here is at least one solution for why this was happening and how to determine if this is your problem.

Open a browser and type the url as http://<WSUS_Server_Name>/iuident.cab.  If you get a file not found error or something similar in your browser, this is probably for you.  If you get a file download dialogue box, first click on cancel and assume this solution is not for your problem.

If you got the file not found or similar error, then here is what you should do.

  1. Open IIS Manager.
  2. Expand the tree for the SBS Server then for Sites.
  3. Click on Default Web Site to highlight it.
  4. Click on bindings in the action pane.
  5. Make sure that there is an entry for http on Port 80 with * as the IP address.

If the entry points to another port or isn’t there, you probably have to make some other adjustments in IIS.  Here is what I think you may find.

Perhaps you have added a new site that you want to host and have given it Port 80, changing the default web site to another port, like 8080.  This would would allow normal Port 80 traffic to the new web site, but would also prevent the default web site from starting because of a port conflict.  The easy solution is to change the default port to say 8080, or some other unused port.

While you could change the physical path for the default web site to the directory you want for your new web site, another way is to do the following.

For bindings, create to entries.  Suppose the external URL is mywebsite.com.  Then create two http bindings, both for port 80 with * as the IP Address.  Use http://www.mywebsite.com as one host name and mywebsite.com as the other host name.  This will direct traffic to the specific web site on port 80 rather than the default traffic.  If you host multiple web sites, do the same thing for each.

This should make the 13042 error go away.

To verify, open command prompt as administrator.  Go to c:\Program Files\Update Services\Tools and run this command:

wsusutil checkhealth

Then open the event viewer, application logs and see if you now get a 13040 Self-update is working event.


Now that you have the basics of how to create a volume on an iSCSI target and mount it for use, let’s explore some reasons for doing so.

Server Storage

The simplest case I will present is a single SBS server.  There are several important data stores for SBS:

  • Exchange Server
  • SharePoint
  • Shared folders
  • LOB or other data that is used by SBS members

When you first install SBS, these are all going to be located on the OS drive.  Using the SBS console, you can migrate them to another drive location.  In the case of LOB data, which is set up independently, you no doubt can chose the drive on which to locate it.

You could start with disks installed on the server in a traditional fashion.  Maybe the drives are 500GB, 1TB, or larger drives.  Your Exchange requirements might be modest, say 15GB.  You estimate that SharePoint files are likely to grow to 20GB in the next six months to a year.  Shared folders might start at 20GB but could go up or down depending on what migrates to SharePoint, for example, and what other growth you anticipate.

You can use one drive for Exchange, one for SharePoint, one for shared folders, and one for LOB data.  But perhaps your server can’t accommodate that many drives.  And it certainly might not accommodate them as RAID 5 or 6 volumes and be independent of each other.  What are the choices?  Well, you could  use one physical disk, no RAID, and create several volumes and use different ones for different data types.  Or perhaps use several drives to create a RAID set and and allocate volumes on it.

Now that you have several volumes on your drive or drive array, sized to accommodate the data you anticipate, what happens if you start to run out of space?  If you have a partition management software tool, you could expand the size of the allocation if there is more free space on the drive(s), or shrink another partition if that were possible and then increase the size of the desired one.  Or, if you have the space available, create another larger partition and move the data to the new one.

Using iSCSI targets is similar to this approach but without the drawbacks and pitfalls of locally attached drives.  First, your storage platform is robust and will have RAID enabled drive support.  Since mountable drives are created from an available pool of space, you can start with the most reasonable size for each disk you need.  Later, you can, on the fly, create a new iSCSI target that is larger or smaller, move or migrate the data to it, disconnect the original target and then delete it.  It is far easier than partition management.

Don’t forget backups.  You can create an iSCSI target and mount it on the SBS server and then configure backups to this drive.  Need another destination?  Very simple.  You get the idea.

Virtual Machines

You probably know from reading some of my other posts I am a fan of virtual machines.  I like the idea of running SBS as a Hyper-v machine; the same box can support test machines, client machines used for remote access, special LOB servers, you name it.  In a virtual machine environment, iSCSI shines.

Start with the drive on which you store the .vhd files.  These can be on a locally attached or a iSCSI drive.  I use iSCSI because I can allocate a right-sized disk in a matter of minutes and have it available on the host server.  Once the virtual machine is created, I can allocate and attach additional iSCSI targets to meet the needs of that vm.

Consider that you might want to test some new software or application, such as a web site, SharePoint feature, or LOB application.  Create a virtual machine and allocate the disk space it needs.  If it turns out to be incorrect, or once your testing has been completed, it is a simple matter to delete the iSCSI targets and return the disk space back to the available pool.

Note a potential disaster recovery scenario.  If you were to lose the host server, the .vhd for the virtual machines would still be on the iSCSI target.  Simply use them to create a virtual machine on another host, and you are back up and running.

Testing

Admittedly, I stole some of my own thunder when talking about virtual machines, but the testing environment is perfect for iSCSI.  Just allocate a target, use it and then delete it once the testing is done.

But it is not just for server and server-level software that iSCSI is useful in testing.  Suppose you want to test from your desktop.  Guess what.  Windows 7 has the same iSCSI initiator, and you can download one for XP.  That means you can create disks, use them and subsequently delete them at the client desktop as well as at the server.

Ad Hoc Uses

I have also used iSCSI targets for quick, one time efforts.  I wanted to update the OS on a laptop for a friend, and I wanted to end up with a clean install but make sure I didn’t lose anything important.  The trouble was that my friend couldn’t tell me what was important…. So I removed the laptop drive, connected it to my desktop with a USB drive connector, copied it completely to an iSCSI target I created, put the drive back in his laptop and installed the new OS.  There were a few things to go back and retrieve, but once he was satisfied I simply deleted the drive.

I will often be called upon to change something at an installation.  I usually create an iSCSI target, do an appropriate backup (sometimes it is just copying files, other times, a more holistic backup), then make the changes.  Getting back to the original state if something goes wrong is neat and tidy; so is the deletion of the disk once I am done.

Less Common But On My Wish List

Recall from Part I that the SCSI commands to read and write data are sent over the network to the target device.  Theoretically, it doesn’t matter whether the network is local or very WAN.  Practically, it is how long it takes for the commands and data to get back and forth.

Here is where I think cloud backups might go for some types of transaction-sensitive data.  Suppose you have a database that gets updates continuously from user transactions, web traffic, etc.  If that data were stored on an iSCSI target, remember that the data and commands to read and write it travel across the network.  Now imagine that the iSCSI target machine, when it gets a write command, also sends that command with the data to another iSCSI target, a mirror, that is remote, i.e., the cloud (public or private).  The difference is that the local target can respond back to the server that the write is complete, but there are no such time constraints on the write to the cloud. The iSCSI target would have to create a queue of writes and execute them in order as they complete asynchronously to the writes it completes locally.  This is not unlike playing a log file against a database.

Because only writes need be executed across the WAN, this is a very efficient operation and with broadband speeds continuing to increase, such a scheme because a very practical continuous backup procedure.

No solution like this is commercially available that I know of, and it would not be appropriate for every application.  Nevertheless, you heard it here first if it does come to pass.

I hope this gives you a flavor of the convenience and wide range of uses that iSCSI provides. In Part III I will discuss the costs and purchasing of a unit.


Many SBS users have web sites that are hosted on subscriber (for fee) hosting environments.  Either they created their site before they got their server, or a third party created the site and used his or her favorite hosting site; perhaps it was from a domain registrar, like GoDaddy or others.

If the web site is primarily for delivering content, as opposed to highly transactional like an online store, you may wish to use your SBS server to host the web site.  Doing so is very easy, but you need to get it right.  Here’s how.

First, you need to get the site files onto your server.  There are different ways to do this depending on where the site is currently being hosted and what you have access to.  Following are several scenarios you might follow.

  • You have a copy of the site files.  In that case, create a folder on the server and copy the files into that folder.  A good place for them is c:\inetpub\wwwroot.  Create a folder in that directory and copy the files into it.
  • You can access the current hosting site via FTP.  Use an FTP client program to copy the files from the current hosting environment, then store them as in the previous step.
  • You can use a program like Microsoft Expression Web or its predecessor SharePoint Designer 2007. The former is a product you can purchase and is an excellent tool to management web content, but you can still download 2007 for free.  Use the site import wizard (under File menu in 2007 and under Site menu in Expression).  Access to the existing site is supported for FTP, Front Page Extensions, File System, WebDAV, and HTTP.  The last is great when you don’t have other access to your web site.

Once you have created the folder with your site files, you now need to create a site in IIS Manager.  Expand the server name and right click on Sites choosing Add a Web Site.  You will see this dialogue box

Change the values shown in this example as follows:

  • Site Name -the name of the site as it will appear in IIS.
  • IIS will create the corresponding Application Pool name and you can leave this as is.
  • Physical Path – browse to the folder where you stored the files.
  • Binding Type – leave as http
  • IP Address – leave as all unassigned unless you want traffic only for a specific adapter
  • Port – leave as 80 unless you have a good reason to use another port; browsers are defaulting to 80
  • Host name – enter the name that will be used to access the site.  More information follows.

Now you may be asking, how can I use port 80 on this new site when it is already being used on the Default Web Site that SBS sets up and uses for Exchange and other things?  The answer is simple: in this new web site, the header values will use what is in the URL from the browser to pick which site to return.

Not that in the above example, http://www.staging.com would be accessed as http://www.staging.com from the browser.  But in order to do that, there is one more thing to be done – make DNS changes.  Before you do, however, test your site thoroughly to make sure it is displaying as you want.  Once you create the site, you can click on the site name in IIS Manager and browse it by clicking on the right hand Actions pane to browse the site.

You need to add records to the public DNS and also to the local zone.  In the public DNS, modify the www record to now point to your server.  If the www record is a host record, change the IP address.  If it is a cname record, have it point to something that points to your server; the REMOTE host record is a safe and easy choice.  In the DNS located on the SBS server, change the www record to point to the server, or add a host record if one doesn’t exist.

That should almost do it, but you might want to make one more change.  Sometimes the URL in the browser will be entered as http://<domain&gt;.com instead of http://www.<domain&gt;.com.  If you want that to be resolved to the web site as well, you will need to add another binding.

In IIS Manager, click on the site name.  In the Actions pane, click on Edit Site Bindings…. At the edit dialogue, you should already see type as http, host name as http://www.<domain>.com, port as 80, and ip address as *.  Click the Add button.  In the add dialogue, enter <domain>.com as the host name and leave everything else as is, then click ok.

Now your web site will resolve browser requests from http://www.<domain>.com or <domain>.com.

Does it go without saying that you should substitute <domain>.com with your own domain name and domain type?


One day, it may come as a huge surprise – and shock – to you when you open Exchange Management Console and see this screen:


If you open Exchange PowerShell, you will get the same error.  What’s more, Remote Web Workplace (RWW) and OWA stop working as well.

So what happened, and how do you fix it?

The answer to the first question has two parts.  What is causing the error is that the Default web site has stopped.  Why it has stopped is the second part of the first question.  To fix the problem, all you need to do is to restart the Default web site.  In order to do that, you have to understand why it stopped in the first place.

A possible cause is that a new web site was created and started whose bindings conflict with the Default site.  A way to unknowingly have this happen is to create a new SharePoint web site in Central Administration and not give it unique bindings.  You can spot this from two different places:

  • IIS Manager – If the Default web site is stopped, try restarting it. If it starts correctly, then for some reason it stopped, and with it restarted, your Kerberos error should disappear.  If it didn’t start, and the reason is a port conflict, then follow the instructions in the following sections of this post.
  • SharePoint Central Administration – From the main page, Application Management, click on Manage web applications.  The default applications are SharePoint Central Administration v4 (for SharePoint Foundation 2010) and SBS SharePoint.  If you have another, check the port and make sure it is not port 80.

Of course, it is possible that you modified the bindings on the Default web site and it is not using port 80.  This is not at all recommended.

If starting the Default web site fails with other than a port conflict, you will have to determine that error and correct it.  If it is because of a port conflict, follow these steps:

  1. In IIS Manager, expand the server, then click on Application Pools.  Make sure all the application pools are started.  If not, try starting any that are stopped.  If they start correctly, proceed.  If not, check for the error that is preventing them from starting and try again.
  2. Expand Sites in IIS Manager. Click on each site and in the right had Actions Pane, take a look at the bindings under Browse Web Site, or better still, click Bindings…. under Edit site.
  3. If you find a binding that has no host name and uses port 80 for a site that is not the Default web site, stop that site.  You can stop the site from Manage Web Site in the Actions pane.
  4. With the conflicting site stopped, try starting the Default site again.

If this solves the problem, you can then focus on the conflicting site.  How did it get there in the first place?  A common culprit might be SharePoint Central Administration if a new site were not properly created.  Or someone attempted to add a public web site but didn’t configure the bindings properly.  I am creating a separate post for how to set the bindings for a public web site in SBS.


This morning, a client called to tell me that their incoming e-mail had stopped over the weekend.  They could still send e-email, though. Probably like you, e-mail is their bread and butter life line to their customers and their vendors.  Maybe like you as well, they prefer to wait until their hair is on fire to do anything; active monitoring is not something they are interested in.

The server showed no reals signs of distress.  All services were up and running.  I could telnet on port 25 to Exchange.  The recent entries in the event log looked pretty normal.  My first symptom that something was amiss was that I could not connect to remote web workplace. IE did not error out in any way, it just sat for about 15 minutes waiting to connect.

As I was starting to dig deeper, one of the users forwarded me a NDR he received when he tried to send himself a message from his private account to the domain account.  The error code in the NDR was 452.4.3.1 insufficient system resources.

That proved to be the essential clue.  I looked at the drive where the Exchange data was stored, and it had only a bit over 5GB remaining.  The thin space was not so much caused by a growth in the Exchange stores but by some accumulation of junk in other folders.  Fortunately, there was a ton of empty space on a 1TB drive on the system.   I moved both Exchange and SharePoint data to that drive; user data was already there.

Since backups were only three hours stale, and they had not received incoming messages for more than 24 hours, I just skipped the new backup.  The moves went pretty quickly with no problems.  I am not sure I wouldn’t advise you to take another backup, just in case, but when the client is nervous…..

I hope you don’t suppose that solved the problem and starting incoming email.  It didn’t.

In order for everything to get cranked back up, some Exchange services had to be restarted.  I ended up restarting all of the services that were running, which was probably overkill, but instead of sorting out which were essential it seemed faster to do them all rather than continue to wait for incoming mail to show.  That feel of the client breathing down your neck…

Here are today’s lessons:

  1. With storage so cheap today, don’t be stingy. Give your Exchange and SharePoint data plenty of room to play.  If possible, devote a drive to Exchange.
  2. Monitor your drives occasionally. If you see a sudden decrease in available space, check to see if someone has started dumping stuff onto the drives (in this case, someone decided to use a server drive to do a full backup of a laptop.  When the person has admin privileges, what’s one to do?
  3. If you have smallish drives, go buy some new bigger ones. A 2TB drive on the commercial side is around $200 or less, and more standard ones under $100.
  4. Better still, invest in iSCSI targets. While you cannot use USB drives for Exchange data, you can with an iSCSI target.  You can provision a new drive in a few moments, attach it to your server (or anything else), and you are off and running.  Literally.

It’s true that an iSCSI target device is more expensive than USB or internal drives, but the increased versatility and flexibility is really worth it.  But let me calibrate more expensive for you.

I have had great success with a particular vendor, and their product line goes from a one drive unit up to an eight drive unit, and you can daisy-chain two of them together.  The software is essentially the same across all of the physical platforms, so you get all the benefits no matter what capacity you choose.  At the upper end, their eight drive units cost between $1400 and $1800 street price, depending on whether you choose rack mount or standalone and whether you get a first or second generation processor.  You then have to throw in the drives (a lot of companies resell them populated, but I prefer to buy my own drives and shop for the best deals; installing them is a trivial affair).

I am planning a post on iSCSI, so if you are not familiar with it, stay tuned for the details.  When I first encountered it, I thought this stuff is way too complex and esoteric and expensive.  It is not.  Especially if you have any thoughts about using virtual machines.  If I want to create a virtual machine, I can just create a new iSCSI target, attach it to the host, and then provision the machine on it.   But I will explain more later.


There is no need to beat around the bush.  It works, and it works well.  At least for hyper-v hosting systems like Microsoft Windows 2008 R2, where I have done most of my testing.  I have little reason to doubt that it works fine on other hosting platforms as well.

If you haven’t tried using virtual machines yet, read the following few paragraphs to get a quick how to guide for Windows 20008 R2.  It’s pretty much the same thing for Windows 2008.

The very first thing you should do is determine if you have an adequate hardware platform for hosting.  Simply put, the beefier your processor(s) and the more memory you have, the better your virtual machines will run.  Yet with a modest server (a Dell T310 with 16GM of memory) I have a Windows 2008 R2 Standard host operating system, a virtual 2008 R2, a virtual 2003 R2 server, a virtual Windows 7 Ultimate, and a virtual Windows XP machine all running nicely.  The latter two machines are allocated only 1GB each and still run nicely and the servers have 4GB and 2GB each and also do nicely. Of course, these are not machines that are heavily used, but still, it’s hard not to be impress with their performance knowing they are so limited in resources.

If you running 2008 or 2008 R2, the first thing you need to do is to enable the Hyper-v role.  From Server Manager, use Add Roles to accomplish this.  It will require a re-boot to complete the addition of the new role, and it takes a few minutes for that role to configure during the restart.  You might also need to check your BIOS settings; you need to enable virtualization there.  Some machines come with it enabled but many do not.

Once the role is added, start Hyper-v Manager located on Administrative Tools. 

Although this view shows a virtual machine running, creating a new one is done the same way.  However, there is one task you should do first and another optional one.  The first task is to set the virtual network up for use by the machines.  The second and optional one is to change the Hyper-v default settings for where virtual machines will be stored.  As you can change it when a machine is created, it is completely optional.

To set up the network for virtual machines, click on Virtual Network Manager on the right hand action pane.  I won’t go through all the options but rather focus on the following scenario:

  • Your host machine has a single NIC card
  • Your NIC has a local LAN address and Internet Access
  • You want the virtual machines to have the same thing.

It’s pretty simple then.  When the Virtual Network Manager opens, in the right hand pane you are offered to create a new virtual network adapter.  Chose External and click Add.  On the next screen, give it a name. Something like Virtual Network Adapter is just fine.  Below that is a radio button set; choose External and from the drop down list, pick the host machine’s NIC.  Click OK.  That’s pretty much it, and you are ready to create your first virtual machine.

Back in Hyper-v Manager, click on New on the action pane and choose virtual machine.  Click past the wizard start screen and specify the name of the virtual machine.  Meaningful is good.  You can accept the default storage location or choose a new one.  Click Next.  Allocate memory to the machine and click next. Then choose the network adapter you set up earlier and click next.

Now you will create the virtual hard disk aka .vhd.  About the only thing you need to change is the size if you want it bigger than 127GB.  The other settings are just fine.  Click next.

If you leave the default “Install an operating system later” then all that happens is that the .vhd is created and the machine will be ready to run at some future point.  For almost all of my purposes, I use an .iso image of whatever OS I want to install. If you have that, click on Install an operating system from a boot CD/DVD-ROM, click on Image FIle and browse to the location.  If you have a physical CD/DVD-ROM, insert the disk and choose the drive letter.

Finish the setup, and if you selected to install an OS, sit back and watch the machine come to life and install the os.  From then on, it is as real as any other machine in your world.

My SBS 2011 was a migration install, running as a virtual machine as a destination server with a physical machine hosting the source SBS 2008 server.  The only difference in how all this works from two physical servers is using the migration answer file.

You cannot directly use a USB device on a virtual machine, so no answer file on a flash drive stick.  Instead, create an .iso from the saved answer file and mount it in the virtual machine’s CD/DVD drive.  To do that, click on the media menu at the top of the virtual machine’s window and choose DVD then mount to mount the .iso file.  Or put in on real media and insert into the host drive.  SBS 2011 installation will find it.

I would love to say that everything was splendid with the migration and virtualization, but it wasn’t.  It took almost two weeks of intense work and investigation and the help of some very talented and good friends to find and fix the issue. None of which had anything to do with the machine being virtual, but finding that out took a lot of hard work.

I will post those findings and trials and tribulations with proper credits and thanks in the upcoming week.


It’s Christmas Eve morning, very early and still, and it seemed like a great time to give you readers another gift of a SBS solution that is, while not all that common, at least very frustrating because there are no event log postings or other information that clues you in to what is really going on.  Fortunately, the fix is simple and quick.  And I knew in a moment, I felt like St. Nick.

First, the scenario.  You install SBS 2008, and everything seems just fine.  You have done the heavy lifting part of installation: got all the connectivity issues done, installed the trusted certificate, added users, created shares, and so on.  Then you attach a USB drive or two, or install a local hard disk (or as I really like, crate an iSCSI drive and connect it) and then launch the configure backup wizard.  The wizard takes you through all the choices, cautions you about formatting the disk, runs for a few seconds then fails with a vague error.  Details of that error confirm the the configuration failed but are equally vague.  Nothing posts in either the application or system event logs.  For good measure, you try again, perhaps with a different USB drive, change the backup device label, or re-boot the server.  None of those standby cure-alls works.

That is because none of them are the source of the error.  Instead, the source of that error comes from Dell’s machine configuration, and perhaps from other manufacturers as well.  Let’s take a look at disk management information from a Dell server:


Notice that Disk 0 has three partitions.  The first is a 63MB reserved partition, the second is a 2.01 GB partition named OS and allocated to drive D:, and the third is the partition for SBS as drive C:.  The culprit, it turns out, is the second partition as it can come configured from Dell.  A little more explanation about server configuration from them is needed, though to fully explain the issue.

When you order a Dell server, you must order at least one disk with it.  Many people don’t order fully populated disk drives from Dell because they buy them much cheaper on the open market and add them once the server arrives.  Also, they may not order any OS pre-installed.  If you have a server from Dell, or any other manufacturer, that falls into this category, then this may be a configuration waiting to create the backup configuration error I am about to explain.

The precise reason for the backup configuration error is because that OS, Drive D: partition arrived configured as FAT32.  When you run the wizard, it knows it cannot deal with FAT32 partitions, but instead of actually reporting this fact, you get, instead, the vague configuration failure.

If you have not ordered an OS pre-installed, the best thing to do is to delete all the partitions on the drive as it ships from the manufacturer during the installation of SBS.  Create a new partition that spans the entire drive, and it will automatically format as NTFS.  Problem solved.

If, on the other hand, the OS recovery partition is one you need and want to keep, then don’t delete it by all means.  But do check to see if it is formatted as FAT32.  If it is, then convert it to NTFS from a command prompt:


First, BE SURE TO RUN CMD AS ADMINISTRATOR to perform this step.  At the prompt, enter the command CONVERT <drive letter>: /FS:NTFS and enter.  In order to proceed, you will need to enter the volume label as it exists.  Obviously, this is a caution to prevent this command from executing against the wrong volume.  In the case of Dell systems, the volume label is OS.

Although the execution of CONVERT above does not show it, as this was a staged demonstration, you are probably also going to get a message telling you that the conversion cannot continue because the drive is mounted and in use.  Fortunately, you also get a prompt asking if you want to dismount and continue, so respond with a Y and press enter, and the conversion takes place.

Now you can run the Backup Configuration Wizard successfully, assuming you have no other FAT32 volumes lurking about either on the source or destination sides of the configuration.

Okay, time for a cup of coffee, then to finish my candy making, distribute some to family and friends, and settle in to enjoy the remainder of Christmas Eve.  Not one more shopping errand left, just some gifts to wrap.  And family to enjoy.

I sincerely wish all of you a Merry Christmas, a Happy, Healthy and Prosperous New Year, and all the best of the holiday season wherever you are and whatever you celebrate.  I encourage you to post your greetings that extend to holidays and customs that touch you and share them with us all.


I have a wonderfully weird, but not all that funny SBS 2008 problem and solution to share with you.  It is possible that this is generic to Windows 2008, but since no one in the known universe seems to have tripped over it, who knows?

Let’s start with the symptoms.  I had a client call in a bit of a panic.  They came in one morning and Exchange was not working.  I logged in remotely and looked first at the services.  All normal services were started, so it wasn’t a service issue per se.

I then started Exchange Management Console, and that is when I got a sinking feeling in my gut.  When I tried to expand anything in the left hand navigation tree, I got a set of error messages that popped up.  They all boiled down to the same thing:  Exchange said it could not connect to the Active Directory.

I started snooping through the event logs.  Sure enough, there were Exchange errors posting every so often that it could not contact AD and that there were no available servers in the organization to contact.  However, I could get to AD through Administrative Tools and I could not spot an issue.

I ran dcdiag and some other diagnostics, and I came up completely without a failing test or condition.  I was getting more stomach flips and jumps.  This was due to the fact that backup had apparently not run in about six weeks.  When I called the client back and asked about the backups, what I got floored me.  The AD problem had popped up about the time the backups stopped, but Exchange continued to run until that morning.  So much for AD restore…

Two other symptoms got noticed.  First, client machines could not get DHCP addresses.  Second, when I pinged the server using its FQDN, I only got a ipv6 response.  However, client machines could ping the server by name or IP address and get a good ipv4 response.  I could see the network from the server and get outside as well.

Rather than bore you with a lot of work with no results to try and figure this problem out, let me cut to the chase with the solution:

  1. Create a new user on the system with network administrator privileges.  I used SBS Console and if you do, note that it won’t create an email account for the user since Exchange is in la la land.
  2. Log off the current network administrator account and log on with the new account.
  3. Caution: Do not disable nor delete the old administrative user. Later, you will delete the profile information which is what caused the problems in the first place.  But you need that user!

You will discover, hopefully, that Exchange is now running great.  When I launched the Management Console, I saw that the first storage group was not mounted.  I used eseutil.exe and found the database was dirty.  I ended up having to run eseutil.exe /p to recover the files because a log was missing or bad, but 30 minutes later the repair was complete, the database mounted and no one lost any data in the process.  Perhaps you will have clean databases and can avoid this step.

I certainly did not want to remove the original user – no telling what security was doled out under its name, but the culprit certainly was a bad profile.  Still logged in under the new user, I went to c:\users\<old profile> to delete the user data, but the best I could do was to delete a few of the sub-folders. The next time I am on site, I will start in safe mode and delete the profile folder, then log on as the old administrator.  Once that works fine, I will delete the new user.

A red herring test was to disable Trend Micro Worry Free Advanced and see if that was causing the problem.  A lot of work for no result, so I would definitely try this first.

What kind of weirdness have you found?


On Monday, July 12, 2010, Microsoft announced two new SBS offerings. While one is a linear step forward along the path that previous versions of SBS have set, the other is a departure in how it is implemented, and certainly how it is priced and deployed.

SBS 7, as it is code-named, is a welcomed upgrade to SBS 2008.  It moves SBS from its baseline products of Windows Server 2008, Exchange 2007 and SharePoint Services 3.0 to Windows Server 2008 R2, Exchange 2010, and SharePoint Foundation 2010.  These are hardly cosmetic changes.  Windows Server R2 is a substantial version change (and I wonder why they didn’t name it 2010), and the same is true for Exchange and SharePoint.

As of yet, not enough details have emerged about the upgrade process and pricing.  We are not certain but very hopeful that an in place upgrade will be available, unlike the migration from SBS 2003 to SBS 2008, or whether Microsoft will give a pricing break to people who have recently purchased SBS 2008.  Stay tuned for more on this as details emerge, but with a public beta slated to start in August, it won’t be long.

Aurora is the code name for the other SBS announcement.  Aurora is aimed at businesses with five to 20 users and “ad-hoc IT budgets”, Microsoft said. “It’s a super-simple server for the very small business,” Windows Server senior product manager Michael Leworthy said at a press briefing.  That would be a lot of you, wouldn’t it?

If you have seen or used Microsoft Home Server, then this is a good starting place to think about Aurora.  It has a local server to handle networking, file sharing and active directory features for authentication and permissions, but Exchange, SharePoint and probably other products from Microsoft and third parties will be cloud offerings.  Simply put, it means that the services are being delivered to users from servers in the Internet cloud.

Really, cloud computing isn’t all that new, but it is the current hot term, so let’s treat it with all the mystical respect it deserves.

Still, the value added in Aurora will the the behind the scenes integration with cloud offerings.  Sign-in will disappear as you now experience it on web pages because it will be done for you, or at least that is how it is expected to be.  And the services in the cloud you subscribe to will be integrated onto the dashboards and control panels and wizards instead of having to manage them separately.

Aurora will also support a file system with duplication.  Aurora completely takes over all the storage devices on its host machine and manages them automatically.  There is little in the way of a file structure to deal with.  Shared and private folders are created from the dashboards and made available without the normal directory traversing.  Duplication means that under the hood, files are replicated to protect against drive loss.  This is similar to RAID storage concepts in the result it produces.

Microsoft assets that a small business owner with slight technical skills should be able to install and maintain Aurora, and that is probably true.  From my experience, though, the areas where small business owners really need help is at the client machine level and understanding how to deal with files in the first place.  And it certainly begs the question of who is going to help them approach their business needs with tools like SharePoint.  So thank goodness for me, eh?

Let me not forget to mention Vail, the code name for the new Windows Home Server.  It has moved to a 64-bit platform only with no 32-bit version. It also has a revamped administrator console now called a dashboard.  It supports Windows 7 groups and uses the same disk technology as Aurora.

I will be focusing on these products as they go through beta and become available.  Please visit again for more information.


Don’t Add SMTP Server to SBS 2008

That is the short answer and caveat.  But if for some reason you do, you will want to remove it.  If you forgot how you added it to subsequently remove it, use Server Manager and then Features.

So Here’s the Thing

You use Server Manager and Features, you remove features and uncheck SMTP.  The remove wizard goes about its business, and the server feature is removed.  But then you get a dialogue box that you need to reboot your server, which you do.  That means everything is okay, right?

Not So Fast, Buddy

When the server comes back up, everthing seems okay. But as the old saw goes, looks can be deceiving.  For grins, try running Connect to the Internet wizard.  It will terminate with an error telling you rem0te access in not configured correctly; restart and try again.  Don’t bother – it won’t help.

Next try running Fix my network.  It will tell you (at least) that your domain name is configured incorrectly and that your connectivity certificate is not installed.  It will try to fix them. Run it again if you want to see how successful that was.  Or take my word for it that it won’t help.

Are You Going to Keep Me in Suspense or What?

To help you keep your sanity and not waste your time, launch Server Manager again.  The SMTP uninstall wizard will finish up and announce SMTP server has been removed as a feature.

All is well in SBS world again.


Enabling Inbound Mail

In short, SBS has SharePoint Services 3.o inbound mail enabled from the get-go.  The only problem is no one seems to tell you about this.  Pick up any book or read any KB article, and you will read about installing SMTP service, configuring SharePoint for inbound mail receipt, and a lot of other things that just don’t hold true for SBS 2008.
All you really need do is to set up inbound mail on any document library or list you want.  Oh yeah, then do the other stuff.

What email addresses do I use?

When you open the inbound email settings for a document library or list, the email address will have a space for you to specify the mail address.  The domain will show “@companyweb” and this is just as it should be.
You can choose any meaningful and valid email name for the library or list.  For example, inquiries@companyweb could be used for a library or list to store incoming emails for company inquiries.

But How Does That Become an Email Address for My Domain?

This is where things are not so obvious, but fortunately they are extremely simple and easy.
On your SBS server, open Exchange Management Console.  Expand Recipient Configuration, then click on Mail Contact.  In the right hand action panel, click on New Mail Contact to launch the wizard.

In the wizzard, select New Contact and click Next.  The Organizational unit default is fine.  You can skip the FirstName, Initals, and Last Name fields and enter a name and alias.  The name can be any string for indentification, but the alias must match the email name you assigned to the SharePoint list or library.

For the external email address, enter <alias>@companyweb.  Then click Next.  You should see that the wizard is creating the mail contact, and click Finish when it is done.

So What Was That About?

Surprising, that was about getting Exchange to recognize that the <alias>@<domainname> really should end up in <alias>@companyweb.  When incoming mail arrives, Exchange will put it in the drop off folder, and SharePoint will pick it up and put it in the right place.

For a bit more insight on what is going on, double click on the mail contact you created or right click and choose properties.  Click on the email tab.  You will see two SMTP addresses, the primary one as <alias>@company web, and a second at <alias>@<domainname>.  The external email address will be <alias>@companyweb.

If you DON’T see these values for email, make sure the Automatically update e-mail addresses based on e-mail policy box at the bottom of the e-mail tab screen is checked.
It’s that simple.


You might have some confusion, as I did, about migrating from Windows 2003 (not SBS 2003) to SBS 2008. This is not so tough, but there are a few things you need to know. Let me help.

First, because there is no limitation on having Windows Server 2003 join an SBS domain, there is no 21 day clock to worry about. So a great part of the migration preparation and timing are things you don’t have to worry about.

Here are the steps you do need to do:

  1. Run forestprep and domainprep from the SBS 2008 DVD on the Windows 2003 machine.
  2. Don’t run the KB update for Exchange Server 2003.  It doesn’t work and isn’t needed.
  3. Create an answer file and use it for the SBS 2008 install.

Make sure the SBS 2008 machine is on the same network as the 2003 server.  Then, insert the USB or other device containing the answer file and begin the install from the DVD.  As a suggestion, when you create the answer file, check the box to make the installation unattended.  It eases some work on your part.

The first few things you need to do at this point are different from migrating from SBS 2003 to SBS 2008.  Some things you don’t do, and others are unique to migrating from Windows Server 2003.

  • The Administrator built-in account will still be operative in the domain once SBS 2008 starts up.  You should create the network administrator account that will eventually replace it in the SBS 2008 console.  When you have removed the 2003 server from the domain later, you can disable the Administrator account.
  • The domain users probably won’t be visible in the SBS console.  You will need to do a bit of adjusting.  I cover the possible steps later.
  • The domain computers probably won’t be visible in the SBS console either.  Again, I will cover the steps later.
  • You don’t need to do, and in fact cannot do, the migration step shown on the SBS console tasks.  Just click the check box and move on.
How do you make the domain users visible?

I found it took two steps.

  1. On either server, open the Administrator tool for AD users and computers.  Find the container where your domain users are located, select the users, and move them to the SBSUSers container located under the MyBusiness container.
  2. From the SBS Console, click on the Users and Groups tab, and you should be on the Users sub-tab. If you have created a new network administrator account here, it should be visible, but the existing domain users should not be.  On the right hand task pane, click on “Change user role for user accounts.”  A window will appear that asks you to select the role  to be applied to users.  Select the appropriate role, click next, and at the bottom of the user accounts list, click on “Display all user accounts in the Active Directory.”  Then select all of the user accounts for the role you selected, and then complete the wizard.  Repeat for each different role you want to assign.

Once you have completed these steps, your existing domain users are visible in the SBS Console.

How do you make the domain computers visible?

This required only a single step.  Open the Active Directory Users and Computers snap-in from Administrator Tools.  Find the folder containing the domain computers.  Select them and move the selected computers to the MyBusiness/Computers Folder.

What next?

It is hard to cookbook exactly what the next steps are.  You probably want to relocate any shared folders and line of business applications to the new SBS 2008 box.  You also want to migrate from Exchange Server 2003 to Exchange Server 2007 on SBS 2008. In order to do this, use System Manager on the 2003 box or Exchange Console on the SBS box to move the mailboxes.

You also need to re-home the pubic folders.  Once that is done, you can uninstall Exchange 2003 if you are sure that your mail is flowing correctly.  NOTE Make sure you run the wizards in the SBS Console or manually reset your router to forward SMTP requests to the SBS 2008 box! Also, if you use a smart host, configure it from the SBS Console.

If you have a custom connector set up in Exchange 2003, make sure it is set up and configured properly for Exchange 2007.  Delete any unneeded or duplicate connectors.

Follow the instructions in this article to remove Exchange 2003 from the domain: How to Remove the first Exchange 2003 Server.

Next, you can dcpromo the Windows Server 2003 from the domain, or if you have other uses for a domain server, it can be left as part of the domain.


I ran into this problem as a result of being in a rush and not carefully checking everything. Let me give you the short background.

SBS 2008 was to be installed in an existing Windows 2003 domain (not SBS 2003). The domain had only a single DC and a handful of client machines. A perfect migration scenario to SBS 2008.

There was a small challenge in terms of hardware. Windows 2003 Server was running on a 64-bit box, and the only other available box was a 32-bit but capable Pentium 4 one. What I did was to make a disk image of the existing hard drive onto a USB drive for backup, then physically move the drive from the 64-bit box to the 32-bit one. It booted up just fine and immediately began running as the existing 2003 DC. I put a fresh hard drive into the 64-bit box, plugged in the USB dongle with the answer file, and started the migration.

Oh, I forgot to mention that I had one small maintenance task to do after the 2003 DC came up on the 32-bit box. I had to change the properties on the NIC to give it a static address. That turned out to be very important.

While the migration install got going, I raised the domain and forest levels of the existing domain. Then off to bed.

When I got back to to the systems the next day, I was surprised to see a message that Active Directory Replication was taking longer than expected. I gave it more time and went about some other things. In fact, I gave it more time several times. My “other tasks” became looking for problems in the event logs and in KB articles and other blogs. Nothing showed up.

Don’t ask me why I checked the settings on the network card, but I did. The static IP, gateway and all were just fine, but I had accidentally switched digits on the primary DNS server, which should have pointed to the DC itself. Instead of 242, I had entered 142.

I changed the setting, and low and behold, the progress bar on the SBS 2008 migration install starting moving again.


The question may be better phrased by looking at the costs and benefits.  Let’s do that, then.

Costs

  1. Server Hardware and Software. A modest server can cost between $400 and $700.  It would have a single processor, albeit it a dual or quad core one, a minimum of 4GB of memory, at least one 250GB or larger drive, and a DVD drive. I would suggest either borrowing an existing monitor from another machine or spending about $25 for a KVM to share with an existing machine (use remote after the installation, so a local monitor is rarely needed). SBS  Standard has a street price of about $1000 or less, and bundled with hardware (such as from Dell and others), it may be a bit less.
  2. Installation and Setup. A well qualified professional should be able to do the install in about three hours for basic server operations.  Desktops are normally quickly to do, but they need to meet minimum specifications (Visa Business or better, XP Professional or better, e.g.).
  3. Other Costs. A USB drive is going to cost about $100 and be needed for dedicated backup.  Other drives may be needed for business data storage.  I there is not a registered domain yet, and not a third party certificate, add about $100 for two to three years of subscription for those things.  Miscellaneous hardware and accessories, such as power strips, cables, etc. might add another $50.  There is always something else you can spend your money on if I missed anything.
  4. Ongoing Support. This is a broad topic, but more than likely the costs of significance are going to be for other IT needs than for the domain itself.  I would estimate less than $1000 for one year of support and maintenance as being very generous.

Benefits

  1. Policy and Control. The biggest problem small businesses are likely to face with their computers is lack of policies and control.  Desktop systems can get loaded with all sorts of questionable software and become targets for virus programs and other malware.  Additionally, many support personnel say most of their calls come from desktop users who are trying to deal with shares, permissions, etc. in a peer-to-peer environment.
  2. Administration. Installing new versions of software, or tracking what copies and versions are already installed, is tough without a domain and group policies.  Keeping anti-virus software and backups up to date is something that happens on a hit or miss basis without a domain server.
  3. Domain Presence. E-mail is cheap and mostly free, but having your own domain email address and web site specific to your domain is much better.  Yes, it is true you can have these services outsourced, but they come free with SBS, so why not save some money while you take advantage of the other things?  It no longer requires an IT expert to do this.
  4. SharePoint Services 3.0. This may be one of the least utilized yet most powerful tools a small business can have.  It, too, comes in the box with SBS.
  5. Support Flexibility. With SBS 2008, almost all support and maintenance tasks can be done remotely for both servers and desktops.  This may give business owners round the clock and immediate support, depending on how they choose to administer their systems.

The bottom line: for about $2000 or less, SBS can be up and running and providing the domain infrastructure for a small business, less if you have a 64-bit computer sitting around waiting for its day in the sun.  It will provide a lot of benefit for that modest cost.

Caution!! Don’t be lulled into thinking everything is going to be just great for the business when SBS is up and running.  That is the whole point of this blog.  But I strongly support the case that without the infrastructure that SBS provides, any IT solutions are at best going to be band aids and not part of the strategic execution of the business plans.